torsdag 20 september 2018

An intro to FazGame

With the TeacherGaming desk there comes a great bundle of games, and as I took the big package I have a lot of games to explore. During work hours = me like! One of the more interesting ones is the sandbox FazGame, where you create your own game. 

However, it demands the teacher to step out of his/her comfort zone and flip the learning. And also flip the mindset how you present the tasks to the students. There is also a lot of unintentionally learning going on - mainly 21st Century themes and math. But that's also skills that you need in the future work life even if you will work in health care. With this said, we're already on cross curriculum so maybe you can involve a colleague?

From the student's view
they login to the TeacherGaming webapp (or directly to FazGame).


This is the dashboard and there is mainly two buttons we're using as newbies. "My creations" and "Create your game!".


Upload own pictures
When pressing "My creations" I can manage my games but also add own images. So let us start there, as the background images in FazGame is a bit boring.


Please note that your image must be exactly 960x600 pixels. If you're a Windows user, you can easily change the resolution of a picture in Paint. Press "Resize", choose "pixels", take away the mark in "Maintain aspect ratio" and write your numbers, Horizontal 960 and Vertical 600.


Find your picture on your computer, write a description and upload the image with the button "Create Asset".


Once it's uploaded you also have to press the button "Create Scenario" in order to access your background in the game editor.


Storyline!
Here is actually where the teacher have to start explain the lesson and task, and it's also this part which is the flipped learning. In order to create a game, you need a game scenario. And if you want your game to be fun to play, you also need a story. What is happening in your game? When you put a question you have to have at least two different options to answer. You maybe need to do research first just to have your game story ready?

Create a game!


First you need to set the basic information. Don't worry, you can later change and edit this part.


This is a bit illogical, in order to save you have to close the window with the 'x'.

Now, welcome to your dashboard!


If you now want to edit your game information, you can press the gearwheel. For example you can change the opening screen - but note - you don't change the background from this window. You can also change your main character. Just press that little blue button.


To change the actual background you have to do it elsewhere. Press the 'x' in the upper right corner to save and you'll get back to the dashboard. Now instead, press the image button.


Next step is to add another character, a person I call a quest giver. A person your hero will interact with. Therefore we now press the button with a portrait.


When I have inserted another character (or object) I can flip it around when pressing the blue button in the upper right corner. I can also move my characters and object with "drag and drop" - simply hold your mouse over the character, press and hold down left mouse button, and drag it where you want it to be.


 And if I want to add an object I press the button with a box.


Code phase!
This is where you have to start create your "code", bring your game into actions. I call it "code" (or programming) as this phase has similarities to code thinking. This new dashboard is also empty, and if you choose a new scenario, that dashboard will also be empty.


First we have to add the interactions that will happens in the game. You have to start with a message dialog (else the game won't start).


Now you see that you have an icon on your dashboard. If you take your mouse over it, you'll see you light it up and also shows hidden features. 


Now "drag and drop" that message icon till the left side of your dashboard. Your workflow will go from left to right.


Now continue and add a conversation with Dialog message and Dialog question. The message is information about the quest and the question gives you two options (and you can add more if you want).


When you're ready arrange your icons like this


First we take care of the FALSE statement. If the player give a wrong answer, they first get feedback and after that, return to the question once again. So we add a Dialog message.


This new icon have to be connected with the others. simple click on the box with a "1" so you get the green button, drag that line to your new message icon. Take away the blue buckets in the lines (click at them) as this is not the right answer.


And now to the correct answer. A new Dialog message box is needed.


But in this case we keep the blue buck in the connection line.


After the player has given a correct answer we want him to earn an item. (If you want the player have a reward, it's the same thing but instead they got points). Click on "Earn item", choose an item (press on the blue button to change) and press OK.


My code!
And I have now connected all the icons with each other. My code looks like this, I have added descriptions so you can follow the flowchart.


First test + debug!
Now we'll run our game for the first time in order to see it's working as we want. There is to ways to start a game, both has the icon of a PLAY button (even though the names are different).


Quickly I see I have forgotten to change the quest giver's character. As it is now, my hero ask herself the question...


Fix the code!
So I have to change the quest giver to the right one. We stop the game by pressing the STOP button and head into "Actions edition".


Mouse over the first box that needs to be edited, then press the blue button next to the character, then pick another one and finally press OK. Repeat with the other boxes/icons.


New game test!
And now we see the character put the questions is the same as in the game.


To continue...
Well, now when you have ONE scenario ready you might want to continue with your game? From the game dashboard, press the "add scene" button!


And by default you get one of FazGame's own backgrounds and your main character centered in the scenario. If you want to change background you have to press the "Change Scenario" button, and once you change the scene name, you also change it in the bottom icons. Please also note your action dashboard is now empty as it's a new scenario where you still havn't added something to.


And in order to come to this new scenario in the first case, you have to choose the previous one, return to the action editing workplace and press the button "change scene". You have to choose what scene (or room) you're heading to next. 


And you're almost done! Now you have to connect the "reward" with the "change scene" icon.


And here's your final code!


onsdag 19 september 2018

TeacherGaming desk & games

TeacherGaming should be so lucky over this awesome teacher in US, Joel Solomon at Village East Elementary School, as he makes so many great tutorials. His link collection is truly impressive too. You can find Mr Solomon's YouTube channel here.

TeacherGaming login
As in many platforms the teacher's and the student's view differ, the TG Desk is no exception. Mr Solomon explains the difference here:


Edit a lesson
Here's a pretty neat feature, edit one of TeacherGaming's ready made lessons.


Educational games
TeacherGaming act as an educational equivalent to STEAM or Origin, a portal to great educational games.

Stranded
So a great game to start your TeacherGaming experience is with the game Stranded - the game teach the students to class spirit and collaboration. This is also a nice game where you as a teacher can get familiar to the platform as it works in a browser.


Life of Bryan
How do you spend your money and time to reach your goals. Learning financial and opportunities but it also teach youth the basic life skills in order to pass school and get a job.


The Electric Shocktopus
The game explains the electrical - positive and negative - charges. And it's also all about timing. You move your octopus with arrow keys and shift. The more levels you unlock, the more editing tools you lock up in order to make your own levels. When you're doing your own levels, you can repeat and confirm your  new knowledge.


Slice Fractions
Students will learn how to add, subtract, and interpret fractions by playing the game "Slice Fractions".


Diffission
This is another game that helps students learn about fractions, but without the mammoth. A bit more adult graphics too.


Contraption Maker
Students will explore and learn how to make Rube Goldberg machines through problem solving various puzzles or even design own ones. A Rube Goldberg machine is a machine intentionally designed to perform a simple task in an indirect and overcomplicated fashion. Often, these machines consist of a series of simple devices that are linked together to produce a domino effect, in which each device triggers the next one, and the original goal is achieved only after many steps.


Reach for the Sun
The life cycle of a plant, you will develop a plant from a seed to it gives a fruit. You have limited time (rounds) to achieve your goal.


Dr. Guts
A game that teach students to understand the human body systems.


tisdag 18 september 2018

FazGame and code thinking

Via TeacherGaming's desk I finally had a chance to test the FazGame which is a tool where students make their own games. I quickly realized FazGame can be used to learn code thinking, or the very basics of programming.

FazGame & Code thinking
How to use FazGame in order to learn code basics, FazGame is our tool to explain code thinking and our Sandbox.

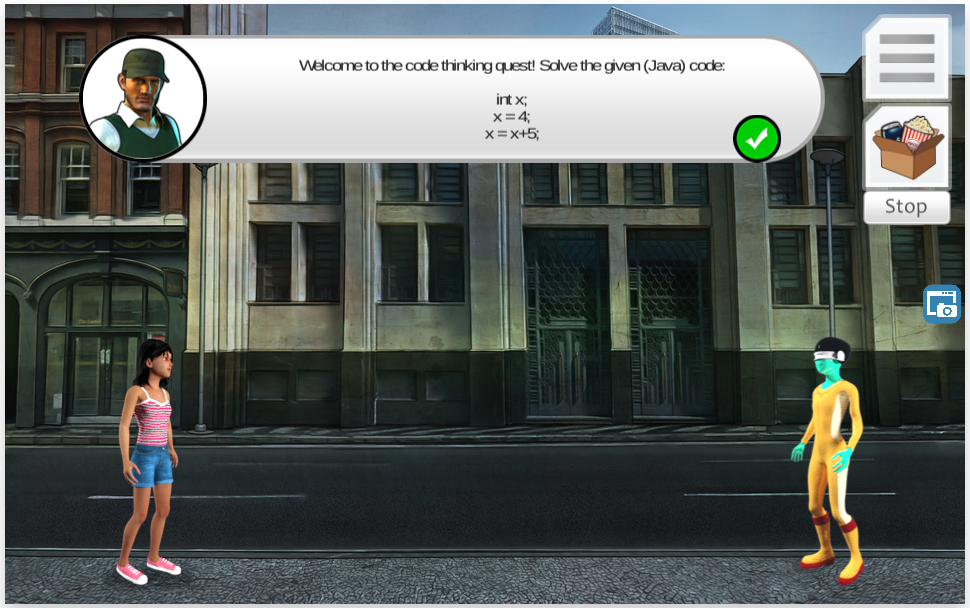
First, we have the Java code.


Key question: What is ’x’?

Step 1 - Pseudocode
Now we have to write our pseudocode (pronounced SOO-doh-kohd). That is a detailed yet readable description of what a computer program or algorithm must do, expressed in a formally styled natural language rather than in a programming language. Pseudocode is sometimes used as a detailed step in the process of developing a program.


Step 2 - Flowchart
A flowchart is a formalized graphic representation of a logic sequence, work or manufacturing process, organization chart, or similar formalized structure. The purpose of a flow chart is to provide people with a common language or reference point when dealing with a project or process.

Flowcharts use simple geometric symbols and arrows to define relationships.

In programming, for instance, the beginning or end of a program is represented by an oval.  A process is represented by a rectangle, a decision is represented by a diamond and an I/O process is represented by a parallelogram. The Internet is represented by a cloud.


Step 3 - FazGame, the fun begins!
With both pseudocode and flowchart ready we jump into FazGame. Now we have to be a bit creative and start with our game / scenario. We have our (female) hero and we have the alien quest giver. According to our plan we should have a message box, then a question and after that two different answers to choose from. We press the button “actions editions”.


Now this is what my dashboard looks like and when I add something from the menu I add the "same objects" as in my flowchart.


Now I add DIALOGUE + QUESTION + OPTIONS + ANSWER + REWARD


Step 4 - my "code"
The result is reminiscent of my flow chart, right? This is my "code".


Step 5 - Run the "code"
Now when I have my "code" ready, I will test run it and will discover if I have something to debug!


Step 6 - Debug the "code"
Nope, it didn't worked as expected! I get no dialogues. 
I have to re-make my code and see what I miss. 
Ah! I was missing a message (information) box!


Step 7 - Running the code
Now I try to run my "code" (game) once more!


SUCCESS!!!

torsdag 13 september 2018

TeacherGaming Desk

Welcome to TeacherGaming Desk!
An introduction for teachers interested in using TeacherGaming Desk.

You who I write to...
is the teacher who had have their first contact with the schools edtech geek teacher who probably have told you this would be super easy. He or she has probably already tried to invite you to the platform and you have no idea what to do next. Luckily there are lots of resources and I will try to put them together in this post. 

Relevant resources
  1. TeacherGaming store - where you order and/or check games.
  2. The Desk - the teacher's dashboard
  3. Students area - where to log in.

First of all, how to join a school on TeacherGaming Desk?
There's a tutorial how to do this at TeacherGaming helpdesk, but as they frequently update the page, it's better to link to them. 


Second, the teacher's dashboard
Now when you're in, you probably start to wonder how this works. Joel Solomon is an amazing US teacher who have created a YouTube series of how to use the TeacherGaming desk. 


Third and next: lessons.
How to use TeacherGaming's website to search for lessons and implement them. 


Notes
There's a few things you have to have in mind.

Classes
You add a class, not a course. If you're several teachers teaching one class, you better share the class instead of having different groups. It's limited to the license you have bought, if you create one math class and one English class, add the student 'Susanne' to both groups, it's different persons and two licenses. 

Students
As said above, you don't add students as individuals. You can't search for a single student, you need to search for his/her class and share that class with your colleagues.

Creatubbles (beta)
Students can share their work (printscreens) with you, with this plugin you can follow their creations along the way. I've previously used Creatubbles as a Minecraft resource, and an introduction to use the platform can be found in this post. Important to understand with Creatubbles in the TG Desk, it's not you sharing pictures with your students. It's your students who can share their work with you!

Students log in
You as a teacher log in to the desk.teachergaming.com but your students log into the platform via the class code and their username. And they use this link app.teachergaming.com (type it into the browser) and their first view will be this:


They can either login to the web app (browser) or download the app. When downloading the app you can choose from download the launcher (and install the games one by one manual) or download the whole bundle (only available for windows).


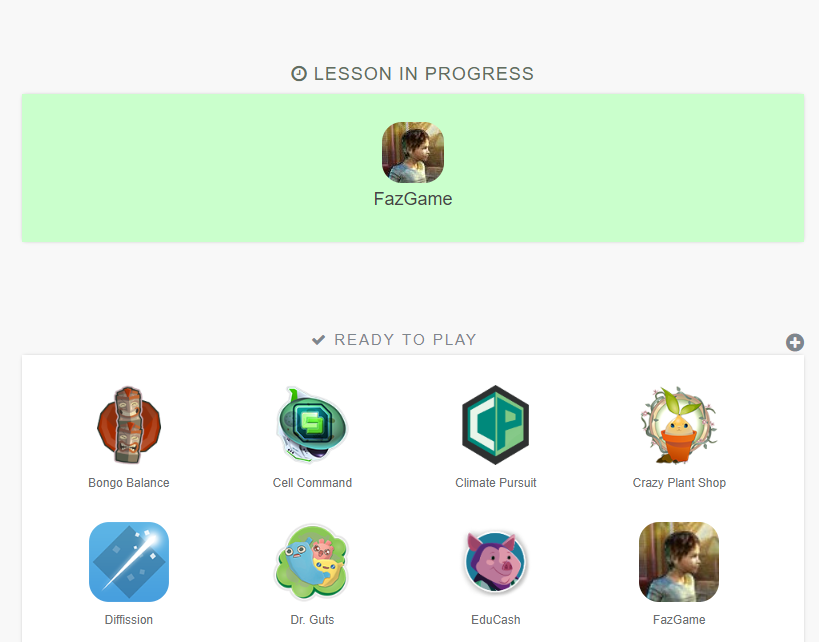
And now your students are in. And hopefully you have already started the lesson as they then see what game to play, else they can play whatever game you have bought to your school. Or actually, they can play all the games, but if you have a lesson started, they see what game they should use.


Compare to this view with no lesson started.


The intentional and unintentional learning
For example, if you use the sandbox game FazGame - where you actual make your own game it's hard to measure the intentional learning. The desk gives you statistics of the unintentional learning (21st century skills) which is knowledge good as anything - but not what you might had in your lessons plan.

Mikael from TeacherGaming explained for me:
"One way we’ve gone around this is awarding skill points for playing while a specific lesson is active. So even if we cannot say you learned about health care while you play FazGame, we might still award you points based on the theme of the lesson. That’s not really learning analytics but should represent the intentional part of learning in some capacity."